距离上次使用Swagger已过去很久了,依稀记得上次使用还是在一个Java的Demo项目里,并且只是浅尝辄止。没想到过了这么久,我真正在生产项目中使用它,并且深度使用了一些核心功能,比如接口测试,比如权限验证。这次使用的是C#开发语言,DotNet的架构。
01|Swagger & Open API
1. OpenAPI 是什么?
OpenAPI 规范(OAS) 是一种与语言无关的标准化格式,用于描述 RESTful API 的结构、路径、参数、返回值等元数据。它的前身是 Swagger Specification。
2015 年,Swagger Specification 被捐赠给 Linux 基金会,并重命名为 OpenAPI Specification(OAS),成为行业开放标准(类似 HTTP 协议的标准)。目前主流版本是 OpenAPI 3.x(最新为 3.1.x)。
OpenAPI 规范的核心规则:
(1) 文件结构
- 必须 使用 YAML 或 JSON 格式编写。
- 必须 包含根字段 openapi(声明版本,如 3.0.3 或 3.1.0)。
- 必须 包含 info 对象(API 的标题、版本、描述等)。
- 必须 包含 paths 对象(定义 API 端点)。
(2) 路径和操作
- 每个端点(如 /users)需在 paths 下定义。
- 必须指定支持的 HTTP 方法(如 get、post)。
- 每个方法需包含 responses 字段(至少一个状态码,如 200)。
(3) 数据类型和参数
- 参数(如查询参数、路径参数)需明确类型(通过 schema 定义)。
- 支持标准数据类型(如 string、integer、array)。
(4) 组件复用
- 推荐使用 components 复用模型、参数等(如 schemas 定义数据结构)。
2. Swagger 是什么?
Swagger 是一套围绕 API 开发的开源工具集,最初由 SmartBear Software 公司维护。它的核心功能包括:
- API 设计:通过 Swagger Editor 编写 API 规范(YAML/JSON格式)。
- 文档生成:自动生成交互式 API 文档(Swagger UI)。
- 代码生成:根据规范生成客户端/服务端代码(Swagger Codegen)。
- 接口测试:通过 Swagger UI 直接调用和调试 API。
OpenAPI 规范脱胎于 Swagger 的原始规范。你可以理解为:Swagger 2.0 → 重命名为 OpenAPI 3.0(后续版本由 OpenAPI Initiative 维护)。OpenAPI 是标准(即 API 描述的规则)。Swagger 是实现该标准的工具集(如编辑器、UI 文档、代码生成等)。
02|ASP.Net项目中集成Swagger
Swashbuckle 是一个用于 ASP.NET Core 和 ASP.NET Web API 的开源库,主要用于自动生成 Swagger/OpenAPI 文档,并提供交互式的 API 测试界面。
1.安装NuGet包(Swashbuckle.AspNetCore)
2.在 Startup.cs中配置Swagger服务
1
2
3
4
5
6
7
8
9
10
11
12
13
14
// 添加 Swagger 服务
services.AddSwaggerGen(c =>
{
	c.SwaggerDoc("v1", new OpenApiInfo
	{
		Title = "My API",
		Version = "v1"
		Description = "OpenAPI document based on OpenAPI 3.0 specification",
		Contact = new OpenApiContact
		{
			Email = "apiteam@swagger.io"
		}
	});
});
1
2
3
4
5
6
// 启用 Swagger 中间件
app.UseSwagger();
app.UseSwaggerUI(c =>
{
	c.SwaggerEndpoint("/swagger/v1/swagger.json", "My API V1");
});
3.访问Swagger UI
运行项目后访问:https://localhost:<port>/swagger,官方案例:https://petstore3.swagger.io。
03|高级配置
3.1 添加 XML 注释
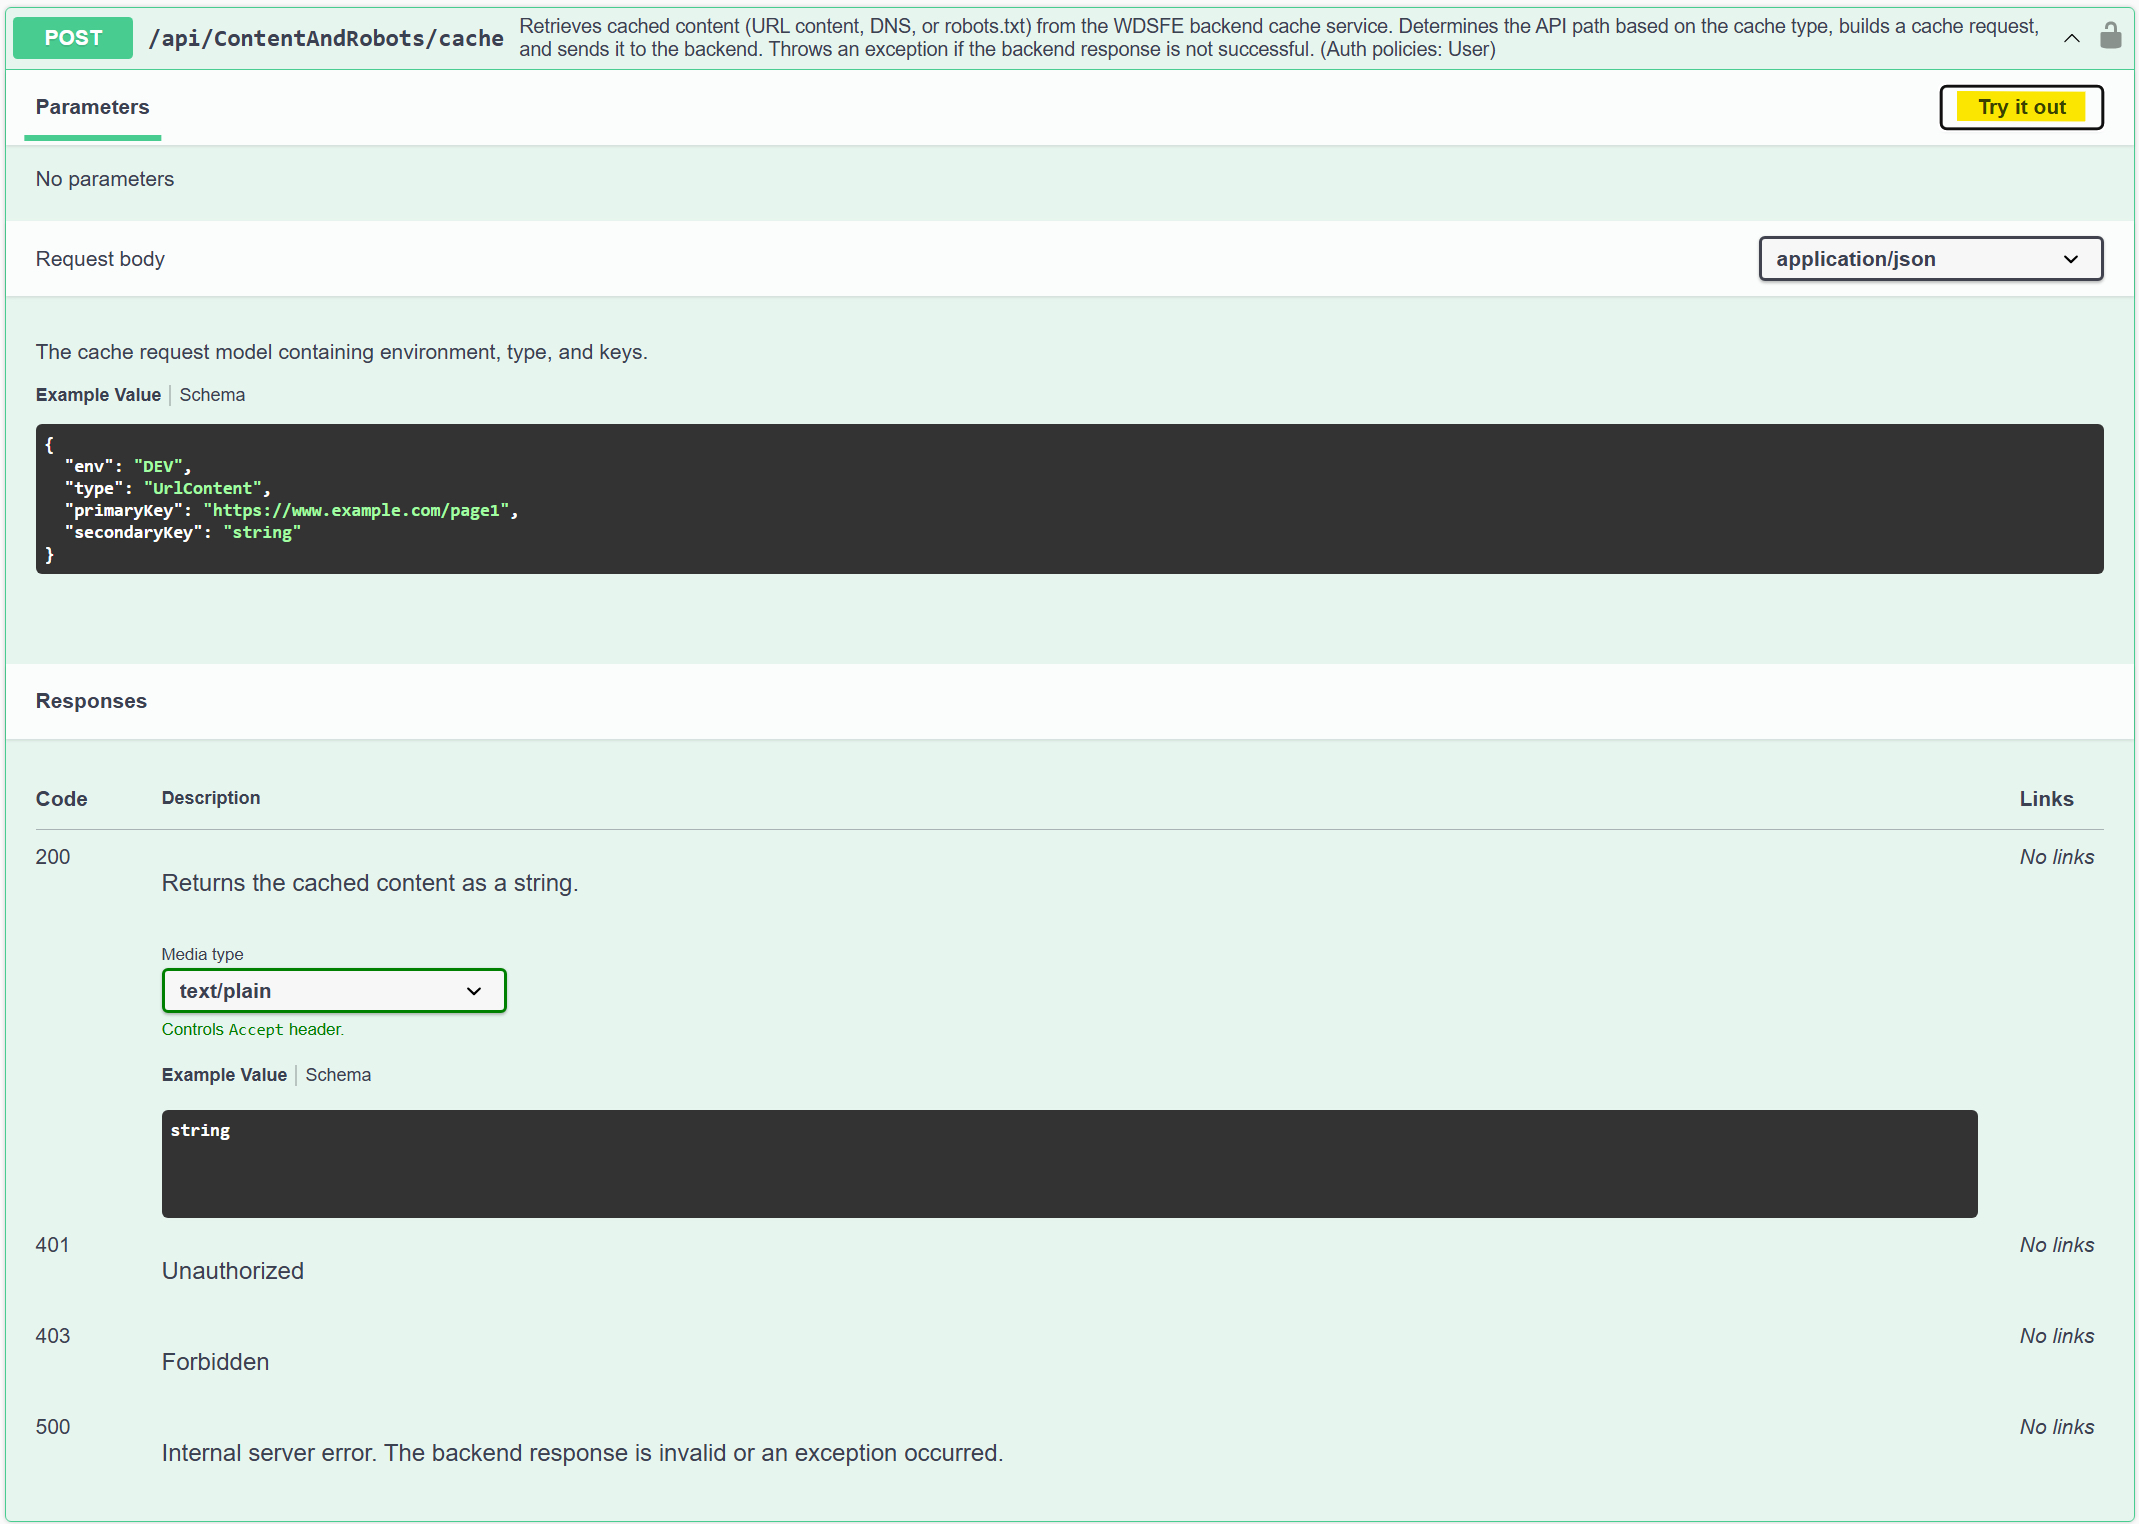
在 .NET 项目中使用 XML 注释(XML Documentation)结合 Swagger 可以显著提升 API 文档的可读性和实用性。
- 将代码中的注释直接映射到 Swagger UI,展示接口功能、参数含义、返回值等。避免手动编写文档,减少文档与代码不一致的问题。
- 在 Visual Studio 或 Rider 中,编写代码时会显示方法、参数的详细说明。注释作为代码的一部分,便于后续开发者快速理解逻辑。
- 通过工具(如 Sandcastle、DocFX)将 XML 注释转换为 HTML/PDF 等格式的离线文档。
以下带有XML注释的代码:
1
2
3
4
5
6
7
8
9
10
11
12
13
14
15
16
17
18
19
20
/// <summary>
/// Generates a hash for the provided URL string.
/// The hash is used for uniquely identifying URLs in a consistent manner.
/// </summary>
/// <param name="target">The URL string to be hashed, provided in the request body.</param>
/// <returns>
/// Returns HTTP 200 OK with the hash value in the format "uHighPart:uLowPart".
/// </returns>
/// <response code="200">Returns the hash value in the format "uHighPart:uLowPart".</response>
/// <response code="500">Internal server error. The backend response is invalid or an exception occurred.</response>
[HttpPost("url-hash")]
[SwaggerOperation(OperationId = "GenerateURLHash")]
[Authorize(Policy = "User", AuthenticationSchemes = "AzureAd, AzureAdPME")]
[ProducesResponseType(typeof(string), StatusCodes.Status200OK)]
[ProducesResponseType(StatusCodes.Status500InternalServerError)]
public IActionResult GenerateURLHash([FromBody] string target)
{
	var urlHash = UrlHashHelper.GetUrlHash(target);
	return Ok($"{urlHash.uHighPart}:{urlHash.uLowPart}");
}
| 标签 | 用途 |
|---|---|
<summary> |
对类、方法或属性的简要说明(显示在 Swagger 接口标题处)。 |
<remarks> |
补充详细说明(通常用于复杂逻辑)。 |
<param name="id"> |
描述参数的含义、格式要求(显示在 Swagger 参数表格中)。 |
<returns> |
描述返回值类型和含义。 |
<response code="200"> |
定义特定 HTTP 状态码的返回说明(需配合 ProducesResponseType 特性)。 |
Swagger UI展示效果:
如何启用 XML 注释支持?
步骤 1:生成 XML 文件
右键项目 -> 属性 -> Build -> Output -> 勾选"Generate a file containing API documentation" -> 选择XML documentation file path
在项目文件中可以看到这样的属性:
1
<GenerateDocumentationFile>true</GenerateDocumentationFile>
步骤 2:配置 Swagger 读取 XML
1
2
3
4
5
6
7
8
services.AddSwaggerGen(c =>
{
    // 加载项目的 XML 注释文件
    var xmlFile = $"{Assembly.GetExecutingAssembly().GetName().Name}.xml";
    var xmlPath = Path.Combine(AppContext.BaseDirectory, xmlFile);
    // true是包括Controller的XML注释
    c.IncludeXmlComments(xmlPath, true);
});
高级配置
1.明确声明响应类型和状态码,与XML注释互补
1
2
/// Returns HTTP 200 OK with the hash value in the format "uHighPart:uLowPart".
[ProducesResponseType(typeof(string), StatusCodes.Status200OK)]
2.为模型类型添加<summary>和<example>注释
Swashbuckle默认不会自动读取<example>标签,需要有一个辅助的ISchemaFilter来解析<example>标签内容。
1
2
3
4
5
6
7
8
9
10
11
12
13
14
15
16
17
18
19
20
21
22
23
24
25
26
27
28
29
30
31
32
33
34
35
36
37
38
39
40
41
42
43
44
45
46
47
48
49
50
51
52
53
54
55
56
57
58
59
60
using Microsoft.OpenApi.Any;
using System.Xml.Linq;
using Microsoft.OpenApi.Models;
using Swashbuckle.AspNetCore.SwaggerGen;

namespace SFSCorpTool.Controller.Interceptor
{
    /// <summary>
    /// Schema filter that reads example tags from XML comments and sets them as Swagger property examples.
    /// </summary>
    public class XmlExampleSchemaFilter : ISchemaFilter
    {
        private readonly XDocument _xmlComments;

        /// <summary>
        /// Loads the XML documentation file.
        /// </summary>
        /// <param name="xmlPath">Path to the XML documentation file.</param>
        public XmlExampleSchemaFilter(string xmlPath)
        {
            _xmlComments = XDocument.Load(xmlPath);
        }

        /// <summary>
        /// Applies the example values from XML comments to the Swagger schema properties.
        /// </summary>
        /// <param name="schema">The OpenApiSchema to modify.</param>
        /// <param name="context">The schema filter context.</param>
        public void Apply(OpenApiSchema schema, SchemaFilterContext context)
        {
            var type = context.Type;

            // Iterate over all public properties of the type
            foreach (var property in type.GetProperties())
            {
                // Construct the XML documentation member name for the property
                var memberName = $"P:{type.FullName}.{property.Name}";
                // Find the corresponding <member> node in the XML
                var node = _xmlComments.Descendants("member").FirstOrDefault(m => m.Attribute("name")?.Value == memberName);

                // Get the value of the <example> tag, if present
                var example = node?.Element("example")?.Value;
                // If an example exists and the schema contains this property, set the example
                if (example != null && schema.Properties.ContainsKey(property.Name))
                {
                    var propSchema = schema.Properties[property.Name];

                    // Try to parse the example as int, bool, or fallback to string
                    if (int.TryParse(example, out var intVal))
                        propSchema.Example = new OpenApiInteger(intVal);
                    else if (bool.TryParse(example, out var boolVal))
                        propSchema.Example = new OpenApiBoolean(boolVal);
                    else
                        propSchema.Example = new OpenApiString(example);
                }
                // If <example> is missing, nothing happens and no error is thrown
            }
        }
    }
}
在Swagger中添加这个自定义的过滤器
1
2
3
4
services.AddSwaggerGen(c =>
{
	c.SchemaFilter<XmlExampleSchemaFilter>(xmlPath);
});
3.2 添加 JWT / OAuth2 认证
添加JWT认证支持
1
2
3
4
5
6
7
8
9
10
11
services.AddSwaggerGen(c =>
{
	c.AddSecurityDefinition("bearer", new OpenApiSecurityScheme
	{
		Description = "JWT Authentication, please input: Bearer {token}",
		Name = "Authorization",
		In = ParameterLocation.Header,
		Type = SecuritySchemeType.ApiKey,
		Schema = "bearer"
	});
});
如果需要在Swagger中要求所有API默认使用JWT安全方案进行授权。可以配置:
1
2
3
4
5
6
7
8
9
10
11
12
13
14
c.AddSecurityRequirement(new OpenApiSecurityRequirement()
{
	{
		new OpenApiSecurityScheme
		{
			Reference = new OpenApiReference
			{
				Type = ReferenceType.SecurityScheme,
				Id = "bearer"
			}
		},
		Array.Empty<string>()
	}
});
它将配合前面通过AddSecurityDefinition定义的方案来标记接口授权的要求,让Swagger UI自动添加授权Header,显示锁图标。
我没有显示调用AddSecurityRequirement,而是使用了SecurityRequirementsOperationFilter,它需要依赖Swashbuckle.AspNetCore.Filters的第三方包,然后配置:
1
c.OperationFilter<SecurityRequirementsOperationFilter>();
通过在Controller或Action上添加 [Authorize(Policy = "User", AuthenticationSchemes = "AzureAd, AzureAdPME")]字段,使得Swagger可以自动过滤出哪些API需要授权,自动为带[Authorize]的Controller或Action添加Security要求。
添加OAuth2认证支持
我这里集成了Azure AD的OAuth2验证,它需要用户在Azure上申请一个App Registration并添加Swagger OAuth2配置:
1
2
3
4
5
6
7
8
9
10
11
12
13
14
15
16
17
18
19
20
21
22
23
services.AddSwaggerGen(c =>
{
	c.AddSecurityDefinition("oauth2", new OpenApiSecurityScheme
	{
		Name = "Authorization",
		In = ParameterLocation.Header,
		Type = SecuritySchemeType.OAuth2,
		Scheme = "bearer",
		BearerFormat = "JWT",
		Flows = new OpenApiOAuthFlows
		{
			AuthorizationCode = new OpenApiOAuthFlow
			{
				AuthorizationUrl = new Uri($"{Configuration["AzureAd:Instance"]}{Configuration["AzureAd:TenantId"]}/oauth2/v2.0/authorize"),
				TokenUrl = new Uri($"{Configuration["AzureAd:Instance"]}{Configuration["AzureAd:TenantId"]}/oauth2/v2.0/token"),
				Scopes = new Dictionary<string, string>
				{
					{ $"api://{Configuration["AzureAd:ClientId"]}/user_impersonation", "Access the API as the signed-in user" },
				}
			}
		}
	});
});
1
2
3
4
5
6
7
8
9
app.UseSwaggerUI(opt =>
{
    opt.SwaggerEndpoint("/swagger/v2/swagger.json", "v2");
    opt.OAuthClientId(Configuration["AzureAd:ClientId"]);
    // 使用 PKCE,避免 client_secret
	opt.OAuthUsePkce();
	// 验证时自动勾选的scope
opt.OAuthScopes($"api://{Configuration["AzureAd:ClientId"]}/user_impersonation");
});
这里配置的是通过OAuth2 Authorization Code Flow + PKCE方式进行验证,但Azure AD不允许非Single Page Application(SPA)类型的应用从浏览器前端跨域兑换授权码为Token。报错如下:
auth errorError: response status is 400, error: invalid_request, description: AADSTS9002326: Cross-origin token redemption is permitted only for the 'Single-Page Application' client-type. Request origin: 'https://sfs-sfscorptool-int-grbpf2g8h3c7buhf.b02.azurefd.net'. Trace ID: b900f899-1bf0-4500-bf65-01c6a2d60a00 Correlation ID: 78ac0dd5-2500-4a4c-8427-297cb7a00b5e Timestamp: 2025-05-21 10:09:40Z
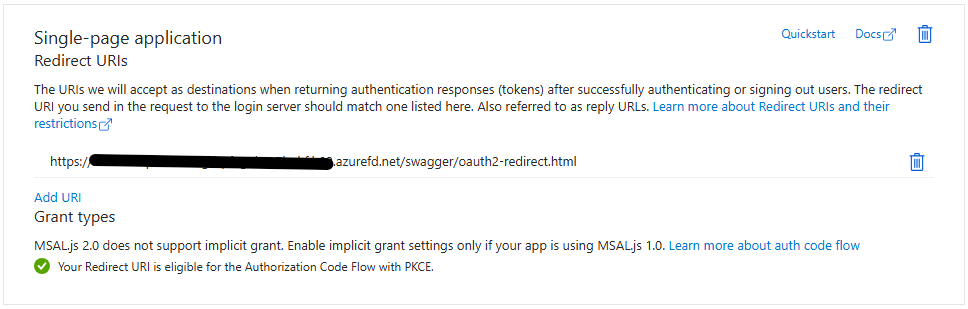
将Azure AD应用类型修改为SPA并配置重定向URI:
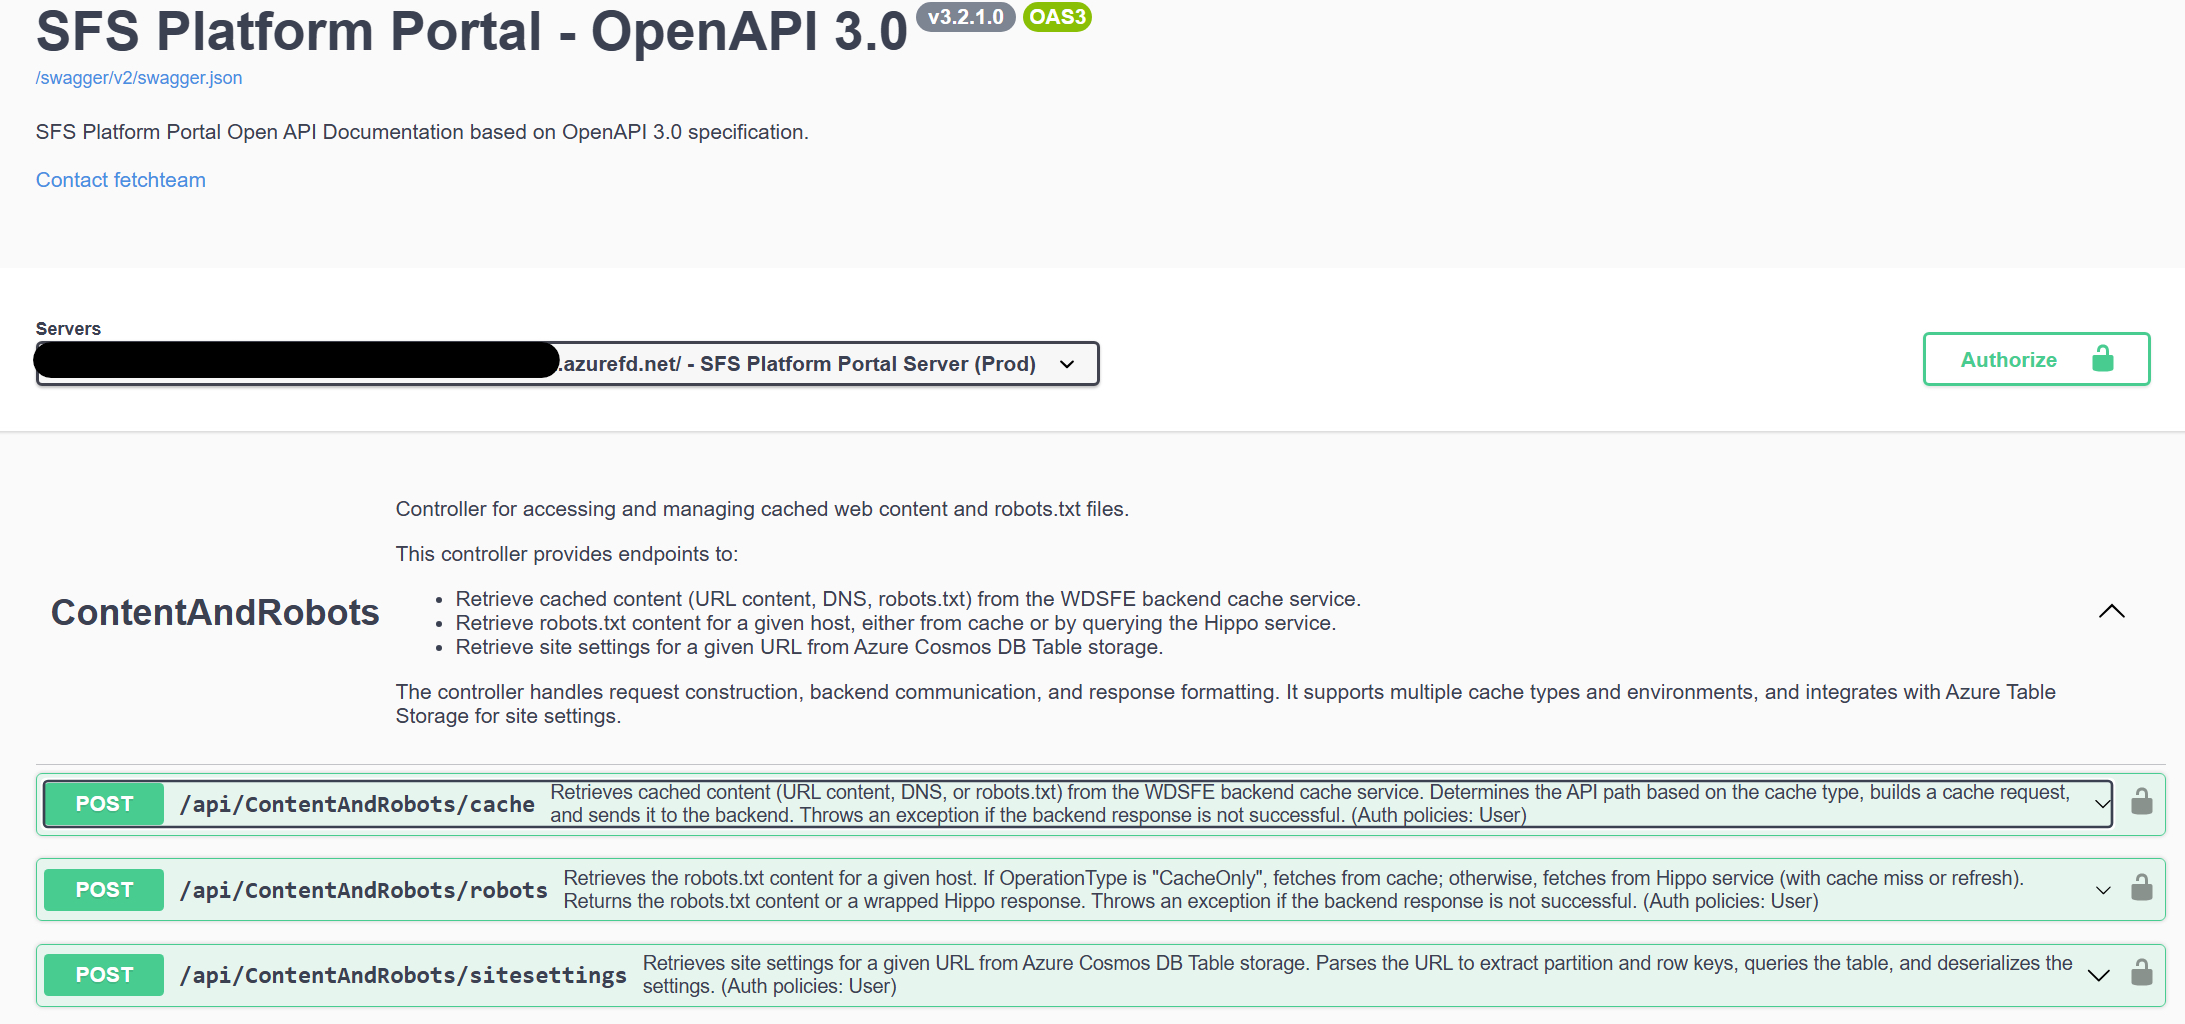
配置完这些,运行程序可以看到
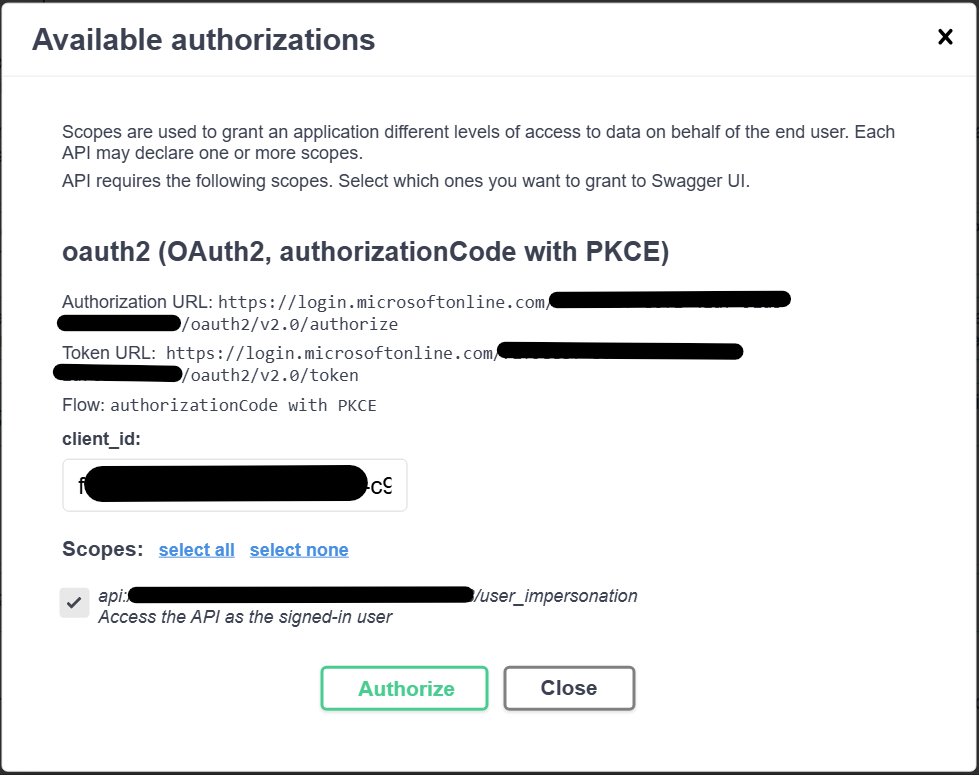
!!! 需要注意的是这里AddSecurityDefinition("oauth2"中的oauth2必须是小写的,否则即使验证通过也无法在调用API时将Token添加到Header中。
3.3 隐藏特定接口
有时候项目中有很多API,但是有一些API不想对外暴露,那么就可以使用[ApiExplorerSettings(IgnoreApi = true)]隐藏控制器或方法:
1
2
3
4
5
[ApiController]
[Route("api/[controller]")]
[ApiExplorerSettings(IgnoreApi = true)]
[Authorize(Policy = "User", AuthenticationSchemes = "AzureAd, AzureAdPME")]
public class ChatBoxController : ControllerBase